You have a React Native application and you want to automate the process to build the iOS version and make it available to beta testers.
In this post we'll use fastlane to build a sample iOS app written in React Native and a CircleCI pipeline that will build and deploy to Testflight automatically whenever code is merged into a branch.
This is the post I wish was available when I was doing this. Don't worry if you are unfamiliar with some terms. We'll start from scratch without assuming prior knowledge and explain things as we go.
You can check out the final version of the repo here
- Installing fastlane
- Configuring fastlane
- Code Signing
- Code Signing with Match
- Build the app
- App Store Connect
- Submit to TestFlight
- Using CircleCI
Installing fastlane
fastlane is an app automation tool you'll come across when working with iOS. We'll use it to build and deploy to Testflight, although there are a bunch of other things you can use it for. Let's see how to install it.
Install the Xcode command line tools
xcode-select --installSince fastlane is written in Ruby, ensure Ruby is installed (version 2.5 or newer). These steps can also be found in the fastlane docs
ruby -v
# ruby 3.0.3p157 (2021-11-24 revision 3fb7d2cadc) [x86_64-darwin20]
If Ruby is not installed, follow the instructions here to install it.
Install Bundler, the Ruby gems manager, to track the dependency on fastlane. Bundler will also be used to run fastlane from the terminal to speed up execution.
gem install bundlerInside your ios folder, create a Gemfile file with this content:
source "https://rubygems.org"

gem "fastlane"
Install fastlane and its dependencies with:
bundle updatebundle update will create a Gemfile.lock file. Make sure it is added to source control.
If you run into an issue with bundle update, most likely it is because of the ruby version installed in your machine. In my case, I had the default 2.6.3 version that comes with macOS Big Sur, known as "system ruby", and had to update to the latest 3.0.3. Follow the instructions from this StackOverflow answer to upgrade your ruby version. After that, you should be able to bundle update.
Confirm the installation is complete by running:
fastlane -v

fastlane installation at path:
/Library/Ruby/Gems/2.6.0/gems/fastlane-2.198.1/bin/fastlane
-----------------------------
[✔] 🚀
fastlane 2.198.1
Nice! You have fastlane installed and are now ready to set up your project to use it.
Configuring fastlane
If you don't have a React Native project and want to follow along, create a new project with:
npx react-native initGo inside the ios folder to initialize fastlane
cd ios
fastlane init
fastlane will ask if you want to include a pre-built task in your automation. We'll manually do all this so enter 4.
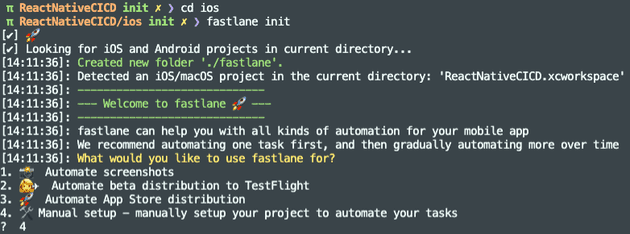 A new
A new fastlane folder was created with 2 files:
- Appfile - contains the app identifier (or bundle id) and the apple id.
- Fastfile - stores the definition of what you want to automate (build, test, deploy to TestFlight, deploy to the AppStore...)
In the Appfile, feel free to remove apple_id. We'll use an App Store Connect API Key instead to authenticate, so we won't need it.
Uncomment the app_identifier line and set your bundle identifier. The Appfile should look similar to this:
# Appfile
app_identifier("com.awesomecompany.reactnativecicd")
Note: when fastlane asks for the app_identifier it means the bundle ID (not to be confused by the App ID from the Developer Portal)
What's a Bundle ID?
The bundle identifier uniquely identifies an application within the Apple ecosystem. This means no two applications can have the same bundle ID across the entire App Store.
This is defined in Xcode and Apple encourages to use reverse domain name notation (eg. com.my-company.myapp), but it can really be anything you want, as long as it's unique and it's not already taken.
Once you publish an app to the App Store, the bundle ID cannot be modified. Well, it could, but you would lose your app history, reviews... in the App Store.
Wait, so what's an App ID then?
The App ID combines both the Team ID and the Bundle ID.
This is what you see when you register a new App ID in the Developer Portal
Code signing
📚 Code signing happens during the build, to ensure nobody has tampered with your app. It assures your app's code can be trusted and hasn't been modified.
Code signing is a scary term and it is common to bump into errors with it.
You see, in order to build an iOS you need a couple of secret files (certificates, private keys and provisioning profiles) to ensure it is you building the app and that it can be trusted. These files are meant to remain secret.
Problem is, these things expire, you have to keep track of them, and every developer in your team can end up having their own. New dev in the team? Uhm, what was the process to onboard her, again?
More so, when you go on to automate the build process using a CI/CD tool, like CircleCI, a remote machine is going to do the build (no longer a developer's macbook from your team) so where do you store these code signing secrets?
Code Signing with Match
fastlane match simplifies sharing certificates and provisioning profiles across your team. Even "sharing" them with your CircleCI build pipeline.
You create a separate private Git repo to store a single encrypted version of your code signing identity and you specify a passphrase to decrypt the files. In addition to git, S3 and Google Cloud can also be used.
So, instead of giving your developers access to the Apple Developer Portal, you give them access to a git repo and give them a passphrase.
Create a private git repository for match (eg. in Github or BitBucket) and copy the url. This repo should be different from your project source code repository.
In your terminal run:
fastlane match initA Matchfile file has been created pointing to the private git repo specified.
git_url("https://carlostorresg@bitbucket.org/awesome-company/match-reactnativecicd.git")

storage_mode("git")

type("development") # The default type, can be: appstore, adhoc, enterprise or development
To do the following, make sure you already have an App ID with your bundle identifier in the Developer Portal.
Create a development certificate with:
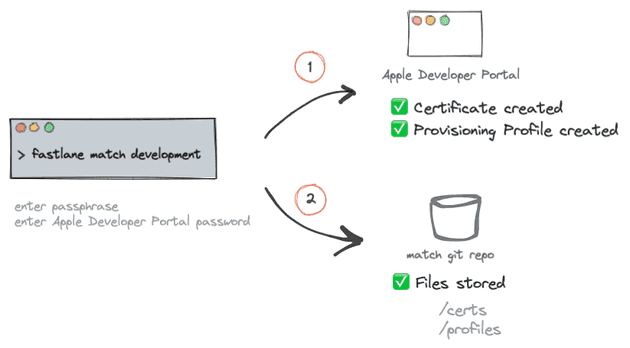
fastlane match developmentWhen running match for the first time on a new machine, you will be asked for a passphrase. This is an additional layer of security as each of the files are encrypted using openssl. As we want CircleCI to do the build for us, we'll set the passphrase in an environment variable in CircleCI later on.
Secondly, you will be asked for a username and password to the Apple Developer Portal so fastlane can create files for you. The username is the email you use to sign in to the Apple Developer Portal.
In the Apple Developer portal, in the certificates list, you should see a new "development" certificate was created along with a new provisioning profile
Similarly, you should see the files now show up in your git match repository.
Under the hood, fastlane uses 2 actions: cert and sigh, to create/get certificates and provisioning profiles respectively.
Sharing signing secrets with your team
Once files are created in the repo, your team can get them by using the read-only option. This command doesn't ask you for a password to the Apple Developer portal. Just provide them with the passphrase so fastlane can decrypt the files (they should have access to the private match repo too).
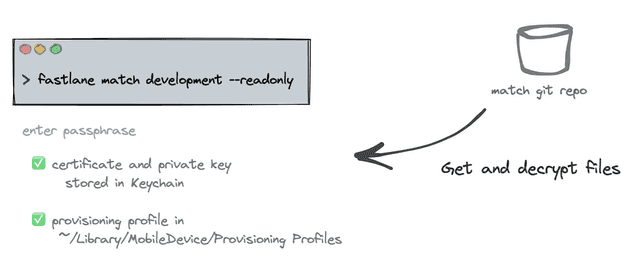 The "development" certificate is used to deploy to internal devices in your team.
Similarly, you can create a "distribution" certificate to deploy your app to TestFlight and the AppStore.
# create a distribution certificate
fastlane match appstore
Update your Fastfile
Now that our match repo has the code signing secrets, let's update the Fastfile to grab them. Fastlane has the concepts of lanes to group instructions. You can think of them as functions. We'll create a new certificates lane (but can be named anything really).
default_platform(:ios)

platform :ios do

	desc 'Fetch certificates and provisioning profiles'
	lane :certificates do
	  match(
		app_identifier: "com.awesomecompany.reactnativecicd",
		username: "myusername@domain.com",
		type: "development",
		storage_mode: "git",
		git_url: "https://myusername@bitbucket.org/awesome-company/match-reactnativecicd.git",
		readonly: true
	  )
	end
end
We can simplify our Fastfile further since we have app_identifier already defined in the Appfile and some other properties in the Matchfile.
default_platform(:ios)

platform :ios do

	desc 'Fetch certificates and provisioning profiles'
	lane :certificates do
	  match(
		readonly: true
	  )
	end
end
You could run the lane with
faslane ios certificatesto get an output like this.
But, we actually won't use the certificates lane directly. We'll create another lane to build the app and we'll call certificates from there.
Manual signing in Xcode
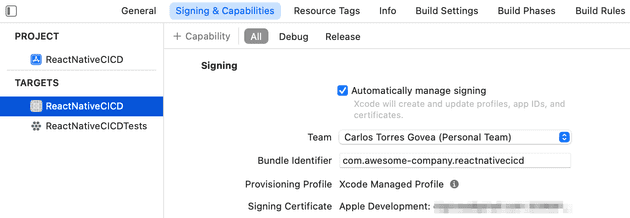
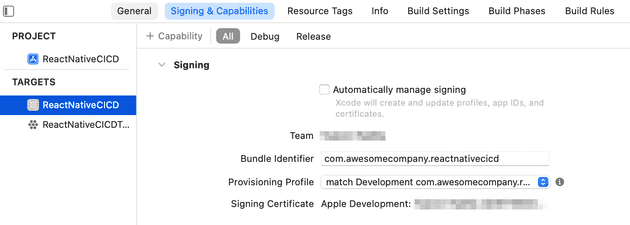
Note that when you're code signing with fastlane match, you need to disable automatic code signing in your Xcode project.
Select the correct Provisioning Profile.
The provisioning profile set in your Xcode needs to be of the same type (appstore, development) as the one you are pulling from your match repo, otherwise you can get the Xcode couldn't find any provisioning profiles matching... or No signing certificate "iOS Development" found error.
What's a Provisioning Profile anyway?
There is no way to install an iOS application on a real device without a provisioning profile.
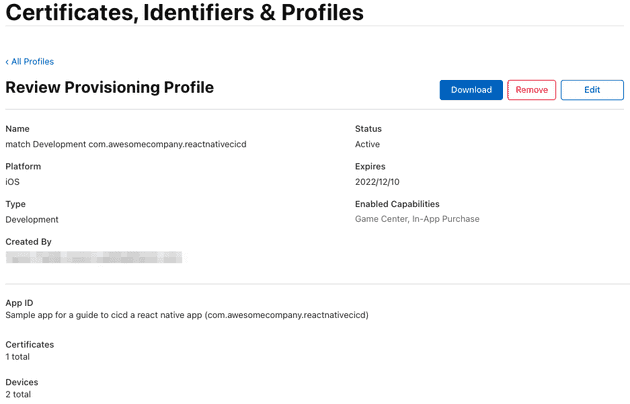
📚 A Provisioning Profile is stored on your phone and contains a set of certificates, device identifiers, the entitlements and the App Id
A provisioning profile is required for installing an app in your phone and contains 4 important things:
- App Id - App Unique identifier
- List of certificates - who can run the app
- List of device identifiers - which devices can run the app
- Entitlements - capabilities enabled in the app (eg. In-App Purchase, Push Notifications, Sign in with Apple...)
These 4 items can be seen when you open a Provisioning Profile in the Apple Developer portal.
A provisioning profile is a collection of digital entities that uniquely ties developers and devices to an authorized iPhone Development Team and enables a device to be used for testing. iPhone Developer Program
Building the app
Add a build lane to your Fastfile. We'll do 2 things here: getting the certificates from the match repo and building the application.
desc 'Fetch code signing secrets. Build the iOS application.'
lane :build do
	certificates
	# Creates a signed file
	gym(
		export_method: 'development'
	)
end
Build the application by running on your terminal:
fastlane ios build
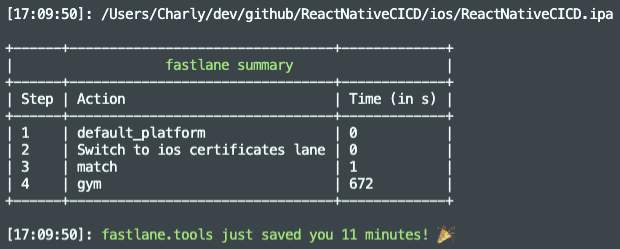 Congratulations, you have a signed .ipa file!
Let's now turn our attention to deploying to TestFlight.
App Store Connect
To deploy to TestFlight, fastlane needs to be able to connect to your Apple Store Connect account. Let's see how we can generate a token we can use in fastlane.
The recommended and official way to authenticate is via an API key. Not all fastlane features are supported by the App Store Connect API but most of them are, including what concerns us here: deploying to Testflight.
Note: 2FA is also supported by fastlane. This means, when you run a certain fastlane action requiring authentication, you are prompted for a username, password and the 2-factor-authentication code. But, as it turns out, you wouldn't want your CircleCI pipeline step to suddenly stop prompting you to enter a 2FA code (actually happened to me). This is where the API key comes handy.
Generating an API Key in AppStore Connect
You will need an App Store Connect admin account for this.
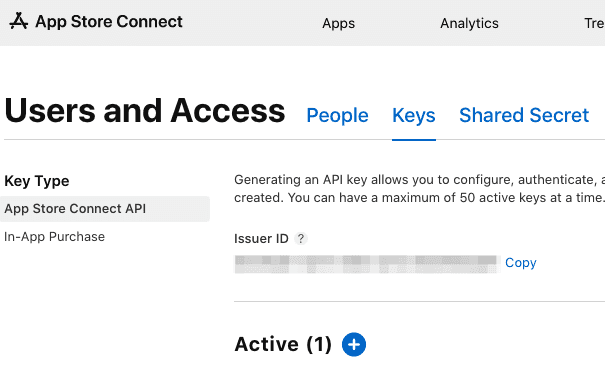
Navigate to the Users and Access > Keys page and click "Generate API Key" or the Add (+) button.
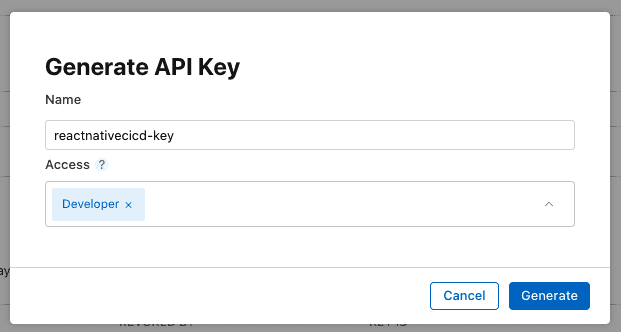
Give it a name and select the role with the minimum access you need. Unfortunately, an API Key cannot be restricted to specific apps.
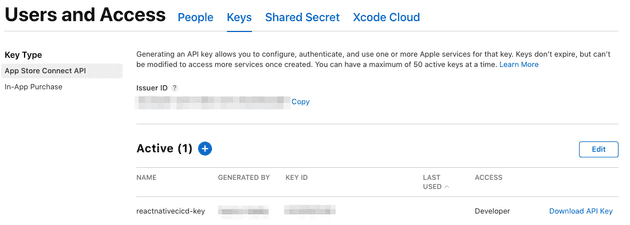
Refresh the page to see the newly created key (it can take up to a few seconds for the Download API Key button to appear)
Copy the issuer_id, Key ID and download the key (can only be done once).
The API key is in the .p8 format and some CI/CD tools don't like the line breaks in it. You might want to consider using a base64 encoded version instead.
cat AuthKey_ABCDEFGH.p8 | base64Authenticating fastlane to App Store Connect
fastlane uses the app_store_connect_api_key action to authenticate to App Store Connect.
app_store_connect_api_key(
  key_id: "D83848D23",
  issuer_id: "227b0bbf-ada8-458c-9d62-3d8022b7d07f",
  key_content: "result of cat AuthKey_ABCDEFGH.p8 | base64",
  is_key_content_base64: true,
  in_house: false
)
Better yet, you can use environment variables and if you name them as specified below they will be automatically loaded.
In your /ios/fastlane/ folder, create an .env file that will be used when running fastlane locally. We'll set these in CircleCI as well when we get to set up the pipeline. Don't check-in the .env file to source control.
APP_STORE_CONNECT_API_KEY_KEY_ID=D83848D23
APP_STORE_CONNECT_API_KEY_ISSUER_ID=227b0bbf-ada8-458c-9d62-3d8022b7d07f
APP_STORE_CONNECT_API_KEY_KEY=YourBase64Key
APP_STORE_CONNECT_API_KEY_IN_HOUSE=false
Now you can authenticate with App Store Connect in your Fastfile just by calling the action directly. The environment variables will be picked up automatically as long as you named them as specified above.
app_store_connect_api_key()Submit to Testflight
TestfFlight is Apple's beta distribution service. Beta users install Apple's TestFlight app on their phone, you as admin invite them to your app and whenever there is a new version available they get nice push notifications prompting to install it.
Setting up fastlane pilot
Add a new lane to use the pilot action (aka upload_to_testflight)
desc "Upload to TestFlight"
lane :beta do
	# Using default env variable names for fastlane to pick them up.
	app_store_connect_api_key(
		is_key_content_base64: true,
	)
	pilot
end
Make sure your app exists in App Store Connect, otherwise create it (make sure to use the same bundle ID).
Use the beta lane to submit to TestFlight:
fastlane ios beta
 Error: "A Distribution Provisioning profile should be used when submitting apps to the App Store"
Ah, that's right, we're using a development provisioning profile but we need an distribution profile in order to submit to TestFlight.
If you haven't already, create a distribution certificate and profile with:
fastlane match appstoreWe require to build the application again, this time using a distribution profile. Before rebuilding, apply these 3 changes:
-
Change the type in
Matchfilefromdevelopmenttoappstore -
In
Fastfilechange theexport_methodtoapp-store(note the hyphen) -
In Xcode, update the provisioning profile under Signing & Capabilities to use "match AppStore [your.bundle.id]".
Note: if you see an error "Provisioning profile (...) doesn't include signing certificate" try toggling the Automatically manage signing checkbox on and off, or restarting Xcode 🤷♂️.
Rebuild the app and submit to TestFlight.
fastlane ios build
fastlane ios beta
Using CircleCI
So far everything we've done has been locally. We get signing secrets, build and submit to TestFlight from our computer.
Finally, let's create a pipeline in CircleCI to do this for us. It will bring us a few advantages:
💻 Build in the cloud, not from your developer's mac
🚫 No need to grant your team access to the Developer Portal
🔑 Keep your signing secrets... secret! :)
💥 Start building as soon as there is new code in your repo
🚀 Submit the new build to Testflight automatically
👩🔬 Testers in Testflight will get a notification when a new version becomes available
Connecting Bitbucket and CircleCI
CircleCI needs to have access to our match repository to read the signing secrets. In our case, we are using BitBucket for the match repo.
In CircleCI, create a Bitbucket user key by following these steps from the documentation.
Then, set up the SSH key in Bitbucket
Ensure you have an SSH match repo address
There are 2 types of addresses in git repositories: HTTP and SSH.
You might have noticed we had been using http to read signing secrets from our match repo that looks like this:
# HTTP repo address
https://carlostorresg@bitbucket.org/awesome-company/match-reactnativecicd.git
This is fine when running fastlane locally and you are using your specific username, but for CircleCI we need an SSH address:
# SSH repo address
git@bitbucket.org:awesome-company/match-reactnativecicd.git
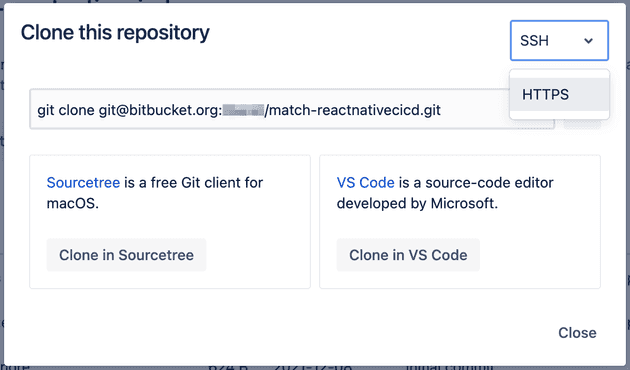
You can get the SSH address in Bitbucket by clicking Clone in the top-right, and then selecting SSH from the dropdown
Add environment variables to CircleCI
Since we are not commiting the env file to the repo, we'll add the variables to CircleCI so they can be accessible to fastlane.
Go to your Project Settings in CircleCI.
In Environment Variables, add the following variables, replacing the values with your own.
APP_STORE_CONNECT_API_KEY_KEY_ID=D83848D23
APP_STORE_CONNECT_API_KEY_ISSUER_ID=227b0bbf-ada8-458c...
APP_STORE_CONNECT_API_KEY_KEY=YourBase64Key
APP_STORE_CONNECT_API_KEY_IN_HOUSE=false
FASTFILE_APP_IDENTIFIER=com.awesomecompany.reactnativecicd
FASTFILE_GIT_URL=git@bitbucket.org:awesome-company/match-reactnativecicd.git
FASTFILE_GYM_EXPORT_METHOD=app-store
FASTFILE_ITC_TEAM_ID=123456789
FASTFILE_MATCH_TYPE=appstore
FASTFILE_TEAM_ID=Q2CBPK58CA
FASTFILE_USERNAME=admin_email@in-apple-developer-portal #
Use environment variables
The environment variables defined in CircleCI can be accessed in your fastlane files via ENV["VARIABLE_NAME"].
Let's update the Matchfile, Appfile and Fastfile to use them.
Matchfile
app_identifier(ENV["FASTFILE_APP_IDENTIFIER"])
git_url(ENV["FASTFILE_GIT_URL"])
storage_mode("git")
type(ENV["FASTFILE_MATCH_TYPE"])
username(ENV["FASTFILE_USERNAME"])
Appfile
app_identifier(ENV["FASTFILE_APP_IDENTIFIER"]) # The bundle identifier of your app

apple_id(ENV["FASTFILE_USERNAME"]) # Your Apple email address

itc_team_id(ENV["FASTFILE_ITC_TEAM_ID"]) # App Store Connect Team ID

team_id(ENV["FASTFILE_TEAM_ID"]) # Developer Portal Team ID
Fastfile
desc 'Fetch code signing secrets. Build the iOS application.'
lane :build do
	certificates
	gym(
		export_method: ENV["FASTFILE_GYM_EXPORT_METHOD"]
	)
end
There's no need to specify the APP_STORE_CONNECT_API_KEY_* variables anywhere. Since we explicitly named them that way, fastlane will automatically load them up. So, our beta lane can still remain like this.
desc "Upload to TestFlight"
lane :beta do
	# Using default env variable names for fastlane to pick them up.
	app_store_connect_api_key(
		is_key_content_base64: true,
	)
	pilot
end
Add setup_circle_ci action
There's one more thing we need to do in Fastfile. We need to add the setup_circle_ci Fastlane action:
# fastlane/Fastfile

platform :ios do
	before_all do
		setup_circle_ci
	end
From the CircleCI docs, this will do 3 things:
- Create a new temporary keychain for use with Fastlane Match (see the code signing section for more details).
- Switch Fastlane Match to
readonlymode to make sure CI does not create new code signing certificates or provisioning profiles. - Set up log and test result paths to be easily collectible.
One last thing...
⚠️ Make sure you are using an appstore provisioning profile in Xcode since we want to deploy to Testflight.
CircleCI pipeline
CircleCI has a circleci-demo-react-native repo. We will use their sample config.yml to build our own. You can see our final config.yml here
We'll have a single workflow build-deploy-testflight containing 3 jobs (linter, approval, ios-build) that will trigger whenever there is a merge in a development branch.
The linter job will execute by default and, if there is approval from an admin in CircleCI (and the linter was successful), the iOS build and deployment to Testflight will kick in
workflows:
  version: 2
  build-deploy-testflight:
    jobs:
	  - linter:
          filters:
			branches:
			  only: development
	  - approve-build-send-testflight:
	      type: approval
	  - ios-build:
		  requires:
		    - linter
		    - approve-build-send-testflight
The process looks like this in CircleCI

And once the approval is given it continues to build and deploy to TestFlight.
Conclusion
Automating the building and delivery of an iOS application can be a daunting task. fastlane helps us abstract a lot but it is easy to have things fall through the cracks with all the different tools involved. Hope this guide was helpful to distill the steps that are required and to see how they all fit together.

